5M-GTE Cressida
Why put a turbo on
a Cressida? Well, that's easy.....power. This car was given to me
by a friend of my neighbor's because the transmission was bad. I
got the tranny fixed and entered it in the Grassroots Motorsports
$1500 Challenge where it finished mid-pack. I was rather
disappointed to find out during the Challenge that it did the
quarter mile in only 17.9s@79mph. Talking to a friend who owns
MKII Supras, I found out that the Cressida is basically a Supra
with a 4 door body and that the exhaust manifold and turbo from a
MKIII Supra will bolt up pretty easily to the 5M-GE engine. There
are a couple of very good resources on the web about this (Steve
Lee has an excellent page at http://www.algorithmicdesign.com/5mgte/subpages/how.htm), which I read before finding a suitable
donor vehicle in Orlando, FL. Bits in hand, I spent Xmas break,
99 installing and fabricating parts for the conversion. Post
turbo, the car has run a best 1/4 of 16.3s@85pmh....not too
shabby an improvement for $650 in parts and about 25 hours in
labor.
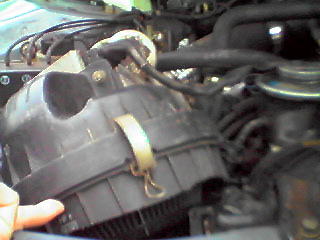 The
stock airbox was cut to make it breathe better while allowing
room for the intake pipes. While you can tell from this picture
that I made anything but a clean, straight cut, this is one of
the cheapest performance modifications you can make to the 5M-GE.
The stock Toyota filter element does a great job, so there is no
need to replace it with a 'high flow' element unless you want
something you can re-use. In addition to opening up the intake
for more airflow, opening up the box gives the car a pretty cool
sucking sound under throttle (under boost, it scares children and
the elderly).
The
stock airbox was cut to make it breathe better while allowing
room for the intake pipes. While you can tell from this picture
that I made anything but a clean, straight cut, this is one of
the cheapest performance modifications you can make to the 5M-GE.
The stock Toyota filter element does a great job, so there is no
need to replace it with a 'high flow' element unless you want
something you can re-use. In addition to opening up the intake
for more airflow, opening up the box gives the car a pretty cool
sucking sound under throttle (under boost, it scares children and
the elderly).
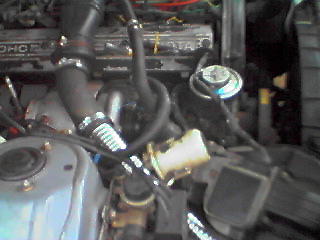
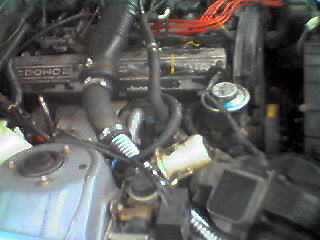 Flexible
exhaust repair pipes make nice shiny intake pipes. These pipes
cost about $5 per section, are airtight, and give gentle, flowing
bends. The hose looping over the intake and back to the turbo is
the heater supply line that provides coolant to the turbo.
Cooling return line goes under turbo intake and then back to
heater core. I have found that this is not the optimum way to
route the cooling lines as there is a static head if the heater
is not in use and the turbo gets no coolant circulation. This
will be changed so that the turbo lines T off of the heater lines
rather than use the entire line. The white canister in the center
of the picture is a vacuum tank that has to be relocated so that
the turbo intake pipe can be mounted.
Flexible
exhaust repair pipes make nice shiny intake pipes. These pipes
cost about $5 per section, are airtight, and give gentle, flowing
bends. The hose looping over the intake and back to the turbo is
the heater supply line that provides coolant to the turbo.
Cooling return line goes under turbo intake and then back to
heater core. I have found that this is not the optimum way to
route the cooling lines as there is a static head if the heater
is not in use and the turbo gets no coolant circulation. This
will be changed so that the turbo lines T off of the heater lines
rather than use the entire line. The white canister in the center
of the picture is a vacuum tank that has to be relocated so that
the turbo intake pipe can be mounted.
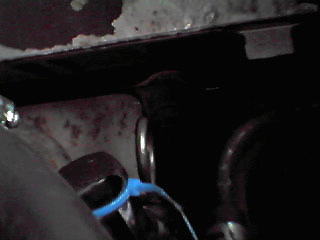
 Since
the PCV system runs a line from the valve cover to the intake
before the throttle body, I routed a new line (black hose, center
shot on the right side) from the valve cover to a catch bottle
that rests against the firewall and capped the opening in the
intake pipe. Optimally, the PCV should be routed to the intake
before the turbo.
Since
the PCV system runs a line from the valve cover to the intake
before the throttle body, I routed a new line (black hose, center
shot on the right side) from the valve cover to a catch bottle
that rests against the firewall and capped the opening in the
intake pipe. Optimally, the PCV should be routed to the intake
before the turbo.
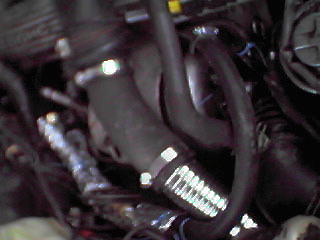 Rather
bad close up of intake pipe and turbo water lines. The water
lines were wrapped in aluminum foil to protect from exhaust
turbine heat (even running them along the fender put them very
close to the turbine)..
Rather
bad close up of intake pipe and turbo water lines. The water
lines were wrapped in aluminum foil to protect from exhaust
turbine heat (even running them along the fender put them very
close to the turbine)..
 Just
another shot of the conglomeration of bits that make up the
turbo.
Just
another shot of the conglomeration of bits that make up the
turbo.
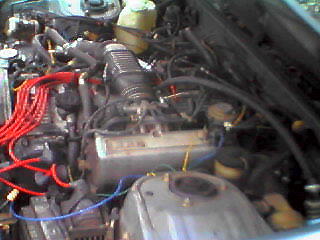
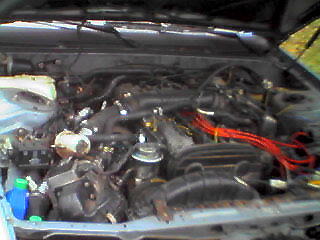 And a
wider engine shot. What used to be a wide open space to the left
of the engine is now jam packed with turbo bits.
And a
wider engine shot. What used to be a wide open space to the left
of the engine is now jam packed with turbo bits.
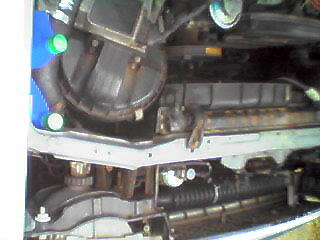 You can
just see the intercooler pushed up against the front bumper at
the bottom of the picture (it's a ridged black piece with a white
zip tie near the middle). The intercooler intake pipe had to be
routed under the lower radiator support (watch those curbs!) and
the exit pipe is routed behind the left headlamp and through a
hole cut in the radiator support (about 8" diameter
hole...also feeds cool air to the air filter)
You can
just see the intercooler pushed up against the front bumper at
the bottom of the picture (it's a ridged black piece with a white
zip tie near the middle). The intercooler intake pipe had to be
routed under the lower radiator support (watch those curbs!) and
the exit pipe is routed behind the left headlamp and through a
hole cut in the radiator support (about 8" diameter
hole...also feeds cool air to the air filter)
.
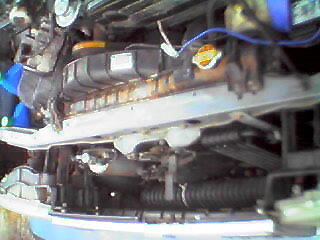 Other
side of the front. The MKIII Supra oil cooler is bolted the
radiator support just to the right of the latch mechanism. This
piece isn't really necessary, but it came as part of the turbo
parts package, so I figured I'd use it. Turbo cooling oil runs
from the filter bypass valve to the oil cooler, then to the
turbo, with the turbo dump pipe running to a hose that connects
it to a union fitting on the oil pan. I have found that this is a
TERRIBLE way to do turbo oiling as the bypass valve on the oil
filter does not flow until the engine is around 1500rpm. Most
people T off of the oil pressure switch, but I couldn't find the
appropriate adapter to fit the block (nowhere in this small town
sells metric fittings). The current plan is to remove the spring
valve from the filter bypass so that it will flow oil all of the
time.
Other
side of the front. The MKIII Supra oil cooler is bolted the
radiator support just to the right of the latch mechanism. This
piece isn't really necessary, but it came as part of the turbo
parts package, so I figured I'd use it. Turbo cooling oil runs
from the filter bypass valve to the oil cooler, then to the
turbo, with the turbo dump pipe running to a hose that connects
it to a union fitting on the oil pan. I have found that this is a
TERRIBLE way to do turbo oiling as the bypass valve on the oil
filter does not flow until the engine is around 1500rpm. Most
people T off of the oil pressure switch, but I couldn't find the
appropriate adapter to fit the block (nowhere in this small town
sells metric fittings). The current plan is to remove the spring
valve from the filter bypass so that it will flow oil all of the
time.
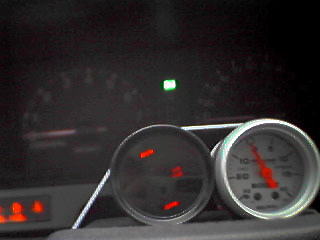 Never,
EVER, add boost without a good gauge and air/fuel meter. I had a
Cyberdyne Air/Fuel meter that I had bought for my Mr2 and never
installed. This is a fairly simple install, with a wire going to
the power, ground and the O2 sensor. Make sure you have a good
sensor if you're going to turbo the car. The boost gauge is an
Autometer ProComp Lite that reads a lot higher than I'll ever be
taking this car.
Never,
EVER, add boost without a good gauge and air/fuel meter. I had a
Cyberdyne Air/Fuel meter that I had bought for my Mr2 and never
installed. This is a fairly simple install, with a wire going to
the power, ground and the O2 sensor. Make sure you have a good
sensor if you're going to turbo the car. The boost gauge is an
Autometer ProComp Lite that reads a lot higher than I'll ever be
taking this car.
I installed these two gauges before the
turbo install to get a baseline and found that my car was running
just under atmospheric pressure at wide open throttle, and full
rich whenever the throttle was depressed. Based on this, I opted
to install the turbo without using larger injectors or a rising
rate FPR like the Supra guys have been doing. I was planning to
run stock boost settings (5psi max), so I wanted to see if the
stock fuel system could handle it. After turbo install, I found
that the car runs stoic to rich under boost with occasional dips
to a lean condition. Backing off of the gas in a lean condition
runs it full rich instantly. If you even think of running higher
than stock boost levels, you'll need to do some fuel system work.
 This is
a really lame picture of where you have to grind the 7M exhaust
manifold so that it will fit on the 5M. Just where the gasket
curves down top center, there is a bolt that holds the engine
lift hook. This bolt does not exist on the 7M and the manifold is
cast in a straight line in that area. A semi-circle of about 0.5
inch diameter has to be ground off of the manifold to accommodate
this bolt. Lay the 5M gasket on the 7M manifold and you can see
what needs to come off.
This is
a really lame picture of where you have to grind the 7M exhaust
manifold so that it will fit on the 5M. Just where the gasket
curves down top center, there is a bolt that holds the engine
lift hook. This bolt does not exist on the 7M and the manifold is
cast in a straight line in that area. A semi-circle of about 0.5
inch diameter has to be ground off of the manifold to accommodate
this bolt. Lay the 5M gasket on the 7M manifold and you can see
what needs to come off.
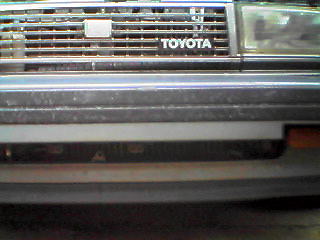 You
can't see it in this picture, but the intercooler is JUST visible
in the lower intake opening below the bumper. This is the only
outward sign that this car is not running a stock engine.
You
can't see it in this picture, but the intercooler is JUST visible
in the lower intake opening below the bumper. This is the only
outward sign that this car is not running a stock engine.
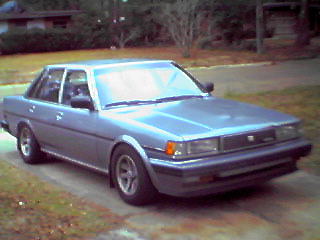 A pretty
good sleeper, even with the Celica GTS wheels in place. Those
wheels came with 235/60-14 tires that required rolling the rear
quarter panel lips. They also rubbed on a front body seam that
had to be hammered flat. I have since sold them and gone back to
stock Cressida wheels to avoid these fitment problems.
A pretty
good sleeper, even with the Celica GTS wheels in place. Those
wheels came with 235/60-14 tires that required rolling the rear
quarter panel lips. They also rubbed on a front body seam that
had to be hammered flat. I have since sold them and gone back to
stock Cressida wheels to avoid these fitment problems.
I also fitted the Celica GTS springs.
This resulted in an unacceptable drop of about 4.5 inches in the
rear and 1.5 inches in the front. I then bought a set of MKII
Supra Eibach springs (Pro Kit). The rear springs did not raise
the car any, but stiffened it up enough that it doesn't rub on as
many bumps as before. The front springs have not been installed
yet.
Other issues that I've encountered doing
this install on a Cressida:
The 90 degree oil filter adapter from the
MKIII Supra must be used or you'll never be able to change your
filter. The Cressida motor mount interferes with oil filter
location and approximately 1/2 inch of the mount must be ground
off so that the filter can be installed. There is also a long
stud holding the bottom of the power steering pump in place. This
must be loosened and moved forward every time you change the oil
unless you cut the majority of the stud off.
There is very little room to mount the
intercooler, and finding places to bolt it to the car is almost
impossible. My intercooler is installed with zip ties...and it
hasn't moved in 4 months.
The turbo oil dump is HUGE (about
7/8" diameter) and the union fitting (get the one from your
MKIII Supra donor because a new one is about $80 from the dealer)
on the pan is the size of standard oil cooler hose (about
1/2" diameter). I put a section of oil cooler hose, with
coolant hose over that and finally the dump hose over top of both
of those in order to use this union with such large hose. The
only 7/8" oil hose I could find was special hydraulic line
that was $14 a foot....
I made exhaust adapters from flexible
repair pipe and a reducing tube. Using the manifold down pipe
from the Cressida, you can cut off the last 8 inches or so where
it bolts to the catalytic converter , run that through a reducing
pipe to a flex pipe that bolts to the Supra down pipe (about
1/2" larger diameter pipe than the Cressida pipes). I did
not replace the entire exhaust because I didn't want to run a lot
of boost and this would help limit the boost level.
See notes with above pictures on cooling
and oil lines to the turbo.
If you run higher boost than 5psi, I
highly recommend 7M-GTE injectors or a rising rate FPR. A thicker
head gasket is a good idea too if you don't do anything to
compensate for the boost (retard timing, etc). My friend with the
MKII Supra is running 14psi with an HKS 2mm head gasket and 4A-GE
fuel injectors.
Update 12/2001: The Cressida Turbo was
dismantled and sold last year in preparation for my move to CA.
The turbo kit was destined for a MKII Supra and the car a used
car lot in AL. It endured over 10K miles under boost with no
problems at all...on an engine with over 160K miles on it.
See the beast in action! (735K) - An autocross in Pensacola during 2000. The car
got sideways and I just planted the throttle to bring it around.
That's tire smoke, folks....not exhaust.